Thursday, July 28, 2011

Summertime Wedding Inspiration


My sister is getting married on Saturday. She lives two hours away, and today I'm feeling a little bit sad that I can't be with her to help her put her bouquets together and run errands. Our other two sisters and Mom will be converging from various places on Bethany's home today to assist her with whatever she needs and be her moral support. 

I've been fighting a nasty virus all week to boot. The doctor fixed me up with some good medication yesterday to help kick the double ear infection and cure my laryngitis in no time. You know, so I can talk and stuff.

In an effort to help me feel more involved (and less lonely), I've compiled some inspiration photos from Pinterest that revolve around her wedding style. The photo on the top of this post is of her actual wedding venue, the Duportail House.


Tuesday, July 26, 2011

New Bedding and Recommendations.


As we are slowly, oh-so-slowly, updating our home with new paint, and re-decorating our walls, there arose the need for some new bedding. We needed at least one new set of sheets to get us through the summer, and we were desperate for a new quilt or bedspread. After searching high and low for a machine washable quilt or comforter (not duvet cover) in coral and yellow florals, I finally decided that this deal on West Elm was just too good to pass up. And let me just say that I'm so pleased with this new quilt! I haven't laundered it yet so I can't say how it will hold up in the wash, but it has a pleasant thickness to it and it's super soft.


Purchasing a new set of sheets was a little bit more complicated. Who knew? I had heard some good things about Target's organic sheets, so I thought I'd give them a go. Holy-scratchy-sheets-batman. Had to take those puppies back to the store! If you're like us and like a soft, smooth sheet, those are NOT for you. I poked around online a bit, and ended up dragging all three of the kiddos out to Bed Bath & Beyond for an hour of roaming the bedding section, touching every sheet they had available over and over and over again. The children did not thank me for that. 


The Papa and I like our sateen sheets. So much so that one set just recently clunked out on us and the fitted sheet ripped at a couple of the corners. (Sheets don't stay on the bed quite as well when there is no elastic.) After some debate, I decided to live dangerously and try sateen weave sheets made from Modal. If you like the crispness of percale weave sheets these sheets are not for you, but boy(!) I think we're really going to love them! They are soft and silky, but not slippery like silk sheets (plus they breathe better than silk too). They require cold water laundering, and need to be dried on low heat; they also come out all wrinkly. I'm just not fussy about that sort of thing, although I may be embarrassed if my wrinkled pillow cases (see top photo) show up on Pinterest or something.


Next up for the bedroom: some sort of a DIY headboard, new curtains, an updated bed skirt, and perhaps a couple of pretty throw pillows!

Thursday, July 21, 2011

Monday, July 18, 2011

DIY // Hair Clip & Earring Holder Tutorial


Largely due to the business, I have more than my fair share of felt hair clips floating around. I've been thinking about creating a fun, more grown-up version of a hair clip holder for myself, and I wanted to share how I crafted a wee combination hair clip and earring holder! It doesn't hold a whole lot of pieces, so I'll definitely have to come up with some sort of organized solution for my daughter's clippies.


MATERIALS:   sturdy stick of some sort, at least 6" across
             strip of fabric, 3" wide x 36" long    
             strip of fabric, 1" wide x 32" long 
             lace, 36"
             cotton twine
          
Before I started, I had my husband sand the bark off of the stick, and then I applied a quick two coats of a semi-gloss paint. I also cut my fabric using scissors and a measuring tape, (or you can use a self-healing cutting mat and rotary cutter). Please note that the fabric dimensions are just suggestions, and do not need to be cut exactly; since you will be braiding the fabric it is not critical that your edges be perfectly straight.


Take your longer strip of fabric (I used the hem from an old worn-out pillow case and a bit of sunny yellow fabric), and fold it in half both ways (first the width, making it 1.5" wide, and then the length). Tie the remaining piece of fabric at the fold (as shown in the top left image), leaving a little bit of a tail. Drape the fabric over your stick where you wish to attach it, bring the tail around the back and pull it through the loop as pictured; cinch your knot tight.


Place the little tail of the middle strip of fabric on top of the rest, so that you can braid it in to hide it (see above image).


Begin braiding your the three bits of fabric together, including the wee little tail that you've previously overlapped. You want to be sure that you don't braid too tightly (or too loosely) since this is where you will hang your earrings. You'll also want to keep the printed side of your odd piece of fabric facing toward you. When you come near the end of your braid cut the longer strip even with the other two, and use the loose piece to wrap around the bottom of your braid and then knot it in the back to secure it. Trim.


Next, fold your length of lace in half, and secure it to the stick the same way you attached the fabric; knot the ends to keep the lace from fraying.


To finish, cut a length of twine and secure the ends to opposite sides of your stick, so as to be able to hang your finished holder from a nail or decorative hook. I also tied a bow to one side of my twine to pretty it up a bit (you can see that better in the very top image).

       
The braided side of the holder is perfect to hang earrings from and the seams are great to slip earring posts through! The two lace tails opposite are just the thing to hold barrettes.    


I know this is kind of a wordy tutorial, so be sure to find my email to the right if you have any questions for me! Happy creating!   

Friday, July 15, 2011

New Tea Rose Necklaces!

I've been having so much fun stitching up these delightful one-of-a-kind tea rose series pieces! Not too long ago, four new necklaces found their way into the shop. 


blue raspberry

Don't you just want to grab of cup of hot tea now? I know I do!

Thursday, July 14, 2011

The Blue Balloon


I'm a sucker for great product photography, and I recently came across a shop that has some gorgeous and compelling shots! Marie over at The Blue Balloon creates lovely jewelry, a lot of which is stunning in its simplicity. Every single one of her photos evokes romance and mystery.


Also find Marie at her blog, twitter, and on facebook.

Wednesday, July 13, 2011

Sweet Groom's Tie.


I recently saw this  on Pinterest and I think it's just the sweetest thing! There may not be a lot of couples that still have their wedding bands engraved, but this really is the next best thing. If your man wears his tie to a big client meeting or an important job interview after your special day, I think it could be a great booster for his confidence. My sister is getting married at the end of July, and I'm definitely sending this her way!

:: Follow all of my Pinterest boards here.

Wednesday, July 6, 2011

DIY :: Paint Chip Garland Tutorial

Since we've recently had to pick out a couple of new paint colors for our old walls, there is a plethora of paint chips lying about the house. I don't foresee myself needing these particular chips again, and I didn't want to chuck them in the trash, so I whipped up a fun paint chip garland to hang on my soon-to-be freshly painted walls. I'm hoping to hang it near the homeschooling blackboard I inherited from my parents!


MATERIALS:   collection of paint chips
                     baker's twine
             craft punch
             hot glue gun
 

Begin by punching out the paint chips using your craft punch (I used a Martha Stewart 1" scalloped circle punch). Be careful to avoid getting any lettering or numbers on your circle if you can. In order to see what I was doing, I flipped the punch over so that I could see exactly where I was cutting.


Next, double up your baker's twine, and put a knot in each end to keep it even. I found it easier to start in the center of the twine and work my way toward the ends from there. If you start at the end instead, be sure to leave at least two inches between the end knot and the first paint chip circle.


To attach the circles, place a paint chip face side down and drape the twine across the center; dab the hot glue on top of the twine to secure and then work the glue to the edges. You want to be sure the glue is not applied too thickly. Place another chip, face side up, on top (this will make your garland double sided); press firmly to secure, being careful not to burn your fingers with the hot glue.


To finish, continue down the length of twine, leaving at least two inches on each end for hanging. I tried to place my circles so that I didn't have super similar colors right next to each, and so that the progression of color down the chain was pleasing to the eye: unless you want a totally random pattern, be sure to do this for both sides of the garland!


What other great uses have you come across for transforming old paint chips?

Note :: I needed eighty-eight paint chip circles to cover both sides of a four foot section of twine.


Friday, July 1, 2011

Jump In!


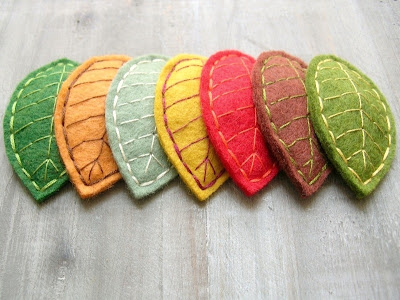
Just in time for fall, I've updated the look of my leaf clips (now bigger and better), and revamped the color combinations a bit! Be sure to stop by the shop and have fun customizing your very own leaf pile.